How to downgrade Windows 10 and reinstall Windows 7 or Windows 8.1
Windows 10 has been out a week now, and you've probably decided by now whether or not it's for you. If you hate Windows 10, it's easy to downgrade Windows 10 and return to Windows 7 or Windows 8.1. We explain how to restore your old Windows in minutes.
How to downgrade Windows 10 and reinstall Windows 7 or Windows 8.1
The first step is of course to back up any information you currently have on your PC that you want to keep. Changing an operating system is a big thing, and data can often be lost along the way. You can use external hard drives, thumb drives, or some of the various online cloud storage such as OneDrive, Google Drive, Dropbox, that offer lots of space for free. When you’ve safely removed any documents, video, photos, or other important data you need, you’re safe to begin. Remember that this may also take a little time, so don’t start if you have plans for the immediate future.
When you install Windows 10 on a PC that already has a Windows, the old version is stored away in a folder called Windows.old. While this takes up space, it also means that you can restore the version via Windows 10 itself. To do this first open the Windows Start menu by clicking on the icon in the bottom left of the screen. Select Settings from the menu.

Now you’ll see on option for Update & Security. Click it.

On the next page you’ll find a list of options on the left, one of which is Recovery. Click this and the main pane will display a variety of choices. The one you want is ‘Go back to Windows x’ where x will be 7 or 8.1 depending on what your computer was running. Click 'Get started' to begin. If you’re using a laptop you’ll also need to connect it to a power source or the option won’t work.

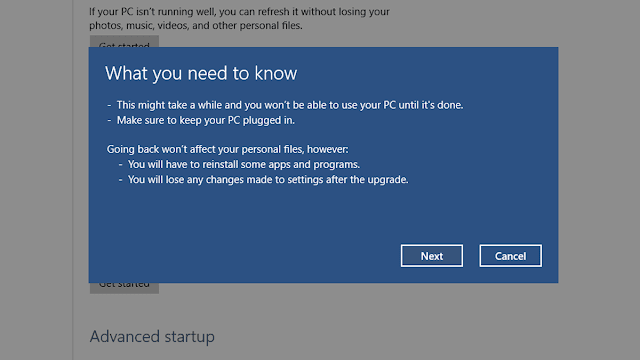
You’ll now be presented with a blue screen (no death involved) asking you why you’re downgrading? Take a moment to fill this in, as it’s a helpful tool for Microsoft in gauging the user’s experience with Windows 10. Click Next when you’re done.

Before Windows starts the process it gives a couple more opportunities to cancel, and also reminds you that if you had a password on your previous version of Windows then you’ll require it once the process is finished. If you’re happy to proceed then just click Next, then put the kettle on.
Windows will now roll back your system to how it was before the technical preview was installed.


Post a Comment